Saturday, November 25, 2017

Sending Handmade Hugs

Hello Blogger Friends! Thanks for taking the time to stop and visit with the Charmed Life Blog this Thanksgiving weekend.
 
Hope all my American readers had a fabulous Thanksgiving. Mine was such a wonderful celebration with family and all my food turned out so delicious. Now it's time to begin getting ready for Christmas. I plan on starting my decorating this weekend.
 
But right now I want to share my project for today. This one I created for my weekly post on the CottageCutz Blog. Today, I am featuring the new Sending Hugs Bear die. So let's get started on the details of my card.

Step 1:  I started my card this week, as in some other weeks, with a sketch I found over on Splitcoaststampers. I thought it was a good one to showcase this sweet little bear. And, also to use some patterned paper that wouldn't get completely covered up.
Step 2: Once the layout was decided, I looked through my paper stash. I wanted to see what I could use that would coordinate with the theme of the bear die.
I found this heart paper that I thought would work perfectly for any of the card ideas I gave above. I also liked the red & white colors as I usually gravitate towards the bright shades.
Red card base: 4 1/4" x 5 1/2"
Heart Patterned Paper: 4 1/8" x 5 3/8"
Red scalloped circle: I used the largest of the Nested Scallop Circles
White Circle Image Panel: I used the largest of the Circle dies
Step 3: I cut my bear image, the flower and the sending word from this die set. I decided to stamp the word "Hugs" just for added interest.
I cut the flower in yellow cardstock to break up all the red I was using. Did you notice the cute little embossed belly button this bear has? I used a blush marker to make it stand out a bit. CottageCutz dies all have such incredible detail.
Step 4: I am now ready to start the card assembly.
The circle in the layout has a flat bottom. I first assembled both circles and then cut off approximately 3/8" from the bottom. Before I adhered to the card base, I stamped my "handmade hugs" sentiment.
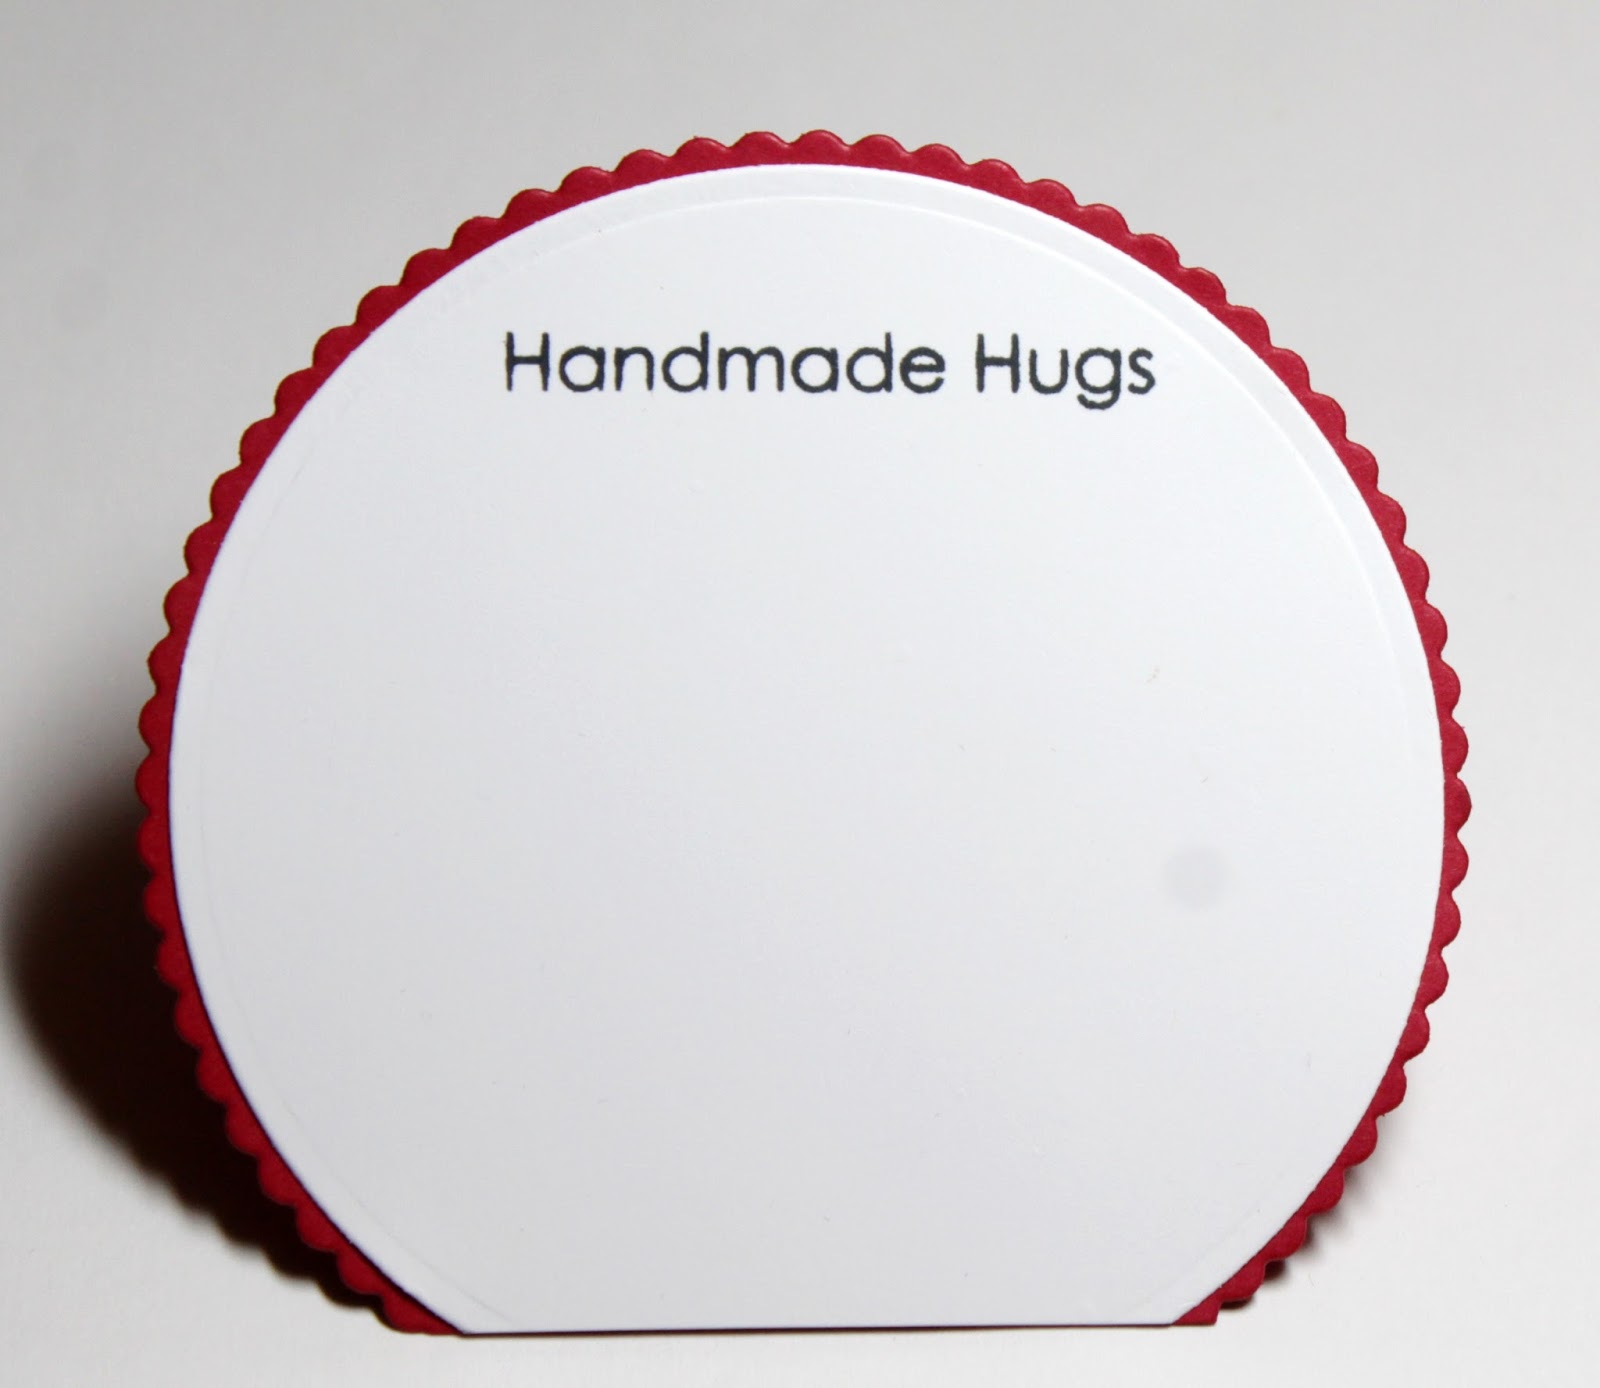
After it was stamped, I thought it was slightly off-center. So I cut 2 red hearts from an older CottageCutz die and added to the left side. It draws your eye away from it not being centered. I attached my bear to this panel with dimensional adhesive. Gives it more depth.
 
To complete my card, I added the sending phrase on a slight angle to the patterned paper. Again it just adds some interest to the card.

Well, that's it for me for this post. I hope I have given you an idea for a way to use this new Sending Hugs Bear die. Remember, there is a big Black Friday sale going on until Tuesday, December 1. It's a chance to pick up some new dies at bargain prices.
 
So until next time........God bless.
 
Dies I used to create card:
http://www.scrappingcottage.com/cottagecutzsendinghugsbear.aspx

http://www.scrappingcottage.com/cottagecutznestedscallopcircleset.aspx

http://www.scrappingcottage.com/cottagecutzcirclesetbasics.aspx
I am also entering:
1.  Crafting with Friends has an anything goes challenge.
2.  Jo's Scrap Shack has an anything goes challenge.
3.  PolkaDoodles has an anything goes challenge.
 

Saturday, November 18, 2017

Feel Better

Hello Blogger Friends! Thanks for taking the time to stop and visit with the Charmed Life Blog this Saturday in November.

It's a rainy and cold day here in Pittsburgh today. One of those all day rains according to the local weatherman. My plans are to get to the supermarket to get all that I need for our Thanksgiving meal. Then I hope to get to my craft room and get it cleaned up - not fun but necessary (LOL)!!!

But, before that I have a card to show. This one I created for my weekly DT post on the CottageCutz Blog.  There are a new release of "get Well" dies coming on Black Friday. Today, I am giving you a sneak peek of two of the new dies.

I am using Chicken Soup and Ouch with Tooth dies. They are all so cute. This little chicken just made me giggle so I had to create a get well card with him as the star. So let's get started on my card details.

Step 1: Since I knew what dies I was going to use, I just needed to decide on my card colors plus the card layout. I found a great sketch that I thought would work well with my design. I chose the wonky striped patterned paper because I thought it would work well with the whimsical chicken image.
Yellow Card Base: 4 1/4" x 5 1/2"
Yellow Striped Patterned paper: 4 1/8" x 5 3/8"
Red Rectangle Layer: used the largest of the pierced rectangle dies.
White Image Layer: used the largest of the rectangle dies.
Step 2: I decided to cut and assemble my die pieces at this point just to make sure everything would fit in the layout I had chosen to use. Love the detail on the can of chicken soup. the chicken is just too cute sitting in the bowl along with the soup noodles.
Step 3:  Started my card assembly. I adhered the panels to the card base with double sided tape. It's my go to adhesive. I wasn't sure what I was going to use for the horizontal layer of the sketch. I thought of ribbon but because this is more of a fun card, I decided to use yellow cardstock. The panel measures 1 1/4" x 4 1/4".

Step 4: I am now ready to adhere the dies to the image panel. I used the chicken noodle soup can in place of the circle on the sketch. The detail on the soup can is amazing. I have a close-up photo and also you can click on the photo to make it even larger.
I finished off my card with a few sequins - hearts and regular circles. I thought it just added a finished element to the bright and cherry card.
 
That's it for me for this post. Until next time........

Dies I used to create card:


I am also entering:
1.  Crafty Catz has an anything goes challenge.
2.  Creative Fingers has an anything goes challenge.
3.  Emerald City Crafts has an anything goes challenge.

Saturday, November 11, 2017

Christmas Cocoa Thanks

Hello Blogger Friends! Thanks for taking the time to stop and visit with the Charmed Life Blog on this Saturday in November.

We are having some really cold temperatures here this weekend. We went from having some record warm weather a couple of weeks ago to some record cold temps. It was 10° with the wind chill overnight. Then mid-week we are back to 50° weather. Crazy!!!

Perfect day for staying in-doors and crafting. That's my goal for today especially since my hubby is at work until 11:30 tonight. So the card I am showing today is one that I created for my weekly DT post on the CottageCutz Blog.

Today, I am showing another of the new 2017 Christmas dies released by CottageCutz This one the is Cocoa & Sweet Treats die. There are 3 different cup designs plus lollipops, candy apples, a donut, gingerbread man and a Christmas cake in this super cute set. The set also includes other Christmas icons - a tree, snowman and holly.

I know I will need some Thank You type cards after Christmas so that's the idea behind this week's card. Let's get started with some details on my card for today.

Step 1: I started my card by choosing my colors. I like making Christmas cards in non-traditional colors but this year I seem to all about the red & green. When I looked through my Christmas papers I found this piece with a circle background. I liked the whimsical appeal and thought it would work well with the images I planned on using.
Cherry Red Card Base: 4 1/4" x 5 1/2"
Patterned Paper Layer: 4 1/8" x 5 3/8"
 
I cut the die images I was using for my card. The cup was cut in a rich, cherry red cardstock that matches the designer paper.  I wanted to layer the cup inside a circle image and decided on using the largest of the Sweetheart Doily dies. I cut in a vanilla cardstock.

 Step 2:  Time to start the assembly of my card. I love using ribbon on Christmas cards and decided to add an olive green strip across the center.
 Once I put the Christmas Cocoa cup on the vanilla doily, I decided to add a red circle layer underneath. It made it pop against the background. I stamped the sentiment in a circle on vanilla cardstock in chocolate ink. I just continued the circle theme that is going on in my patterned paper. I used the stitched circle dies - the 3rd & 6th largest.
 Added the image circle and the sentiment circle to the background layer.
Step 3:  To finish off my card, I added a gold cord bow and some green sequins. I hope I have given you an idea for a card using this cute new set. Have a great week-end and I will see you next Saturday.
 Dies I used to create card:
http://www.scrappingcottage.com/cottagecutzcocoaandsweettreats.aspx

http://www.scrappingcottage.com/cottagecutzsweetheartdoilies.aspx


http://www.scrappingcottage.com/cottagecutzstitchedcirclesetbasics.aspx

I am also entering:
1 Crafty Friends Challenge has a Christmas challenge.
2Jingle Belles has a thankful for the holiday challenge.
3.  Polka Doodles has an anything goes challenge.
4.  Craft Rocket Challenge has a Christmas is coming challenge.


Tuesday, November 7, 2017

Birthday Shaker Card

Hello Blogger Friends. Thanks for taking the time to stop and visit with the Charmed Life Blog on this 7th day of November 2017.
 
Today is a special day for me. I am celebrating my 30th wedding anniversary. I can't believe how quickly the years have gone. I still remember lots of the excitement of my wedding day. We are going to dinner to celebrate tonight. Just not sure where yet. It will be someplace special I am sure.
 
 I made this card to give to my hubby. Don't know why I didn't wait until today to post it (lol)! Anyway, my card for today is a birthday shaker card. So let's get started with some details.
 
This is my card for 2 challenges over on Splitcoaststampers. :

1. Rebecca's DTGD challenge

2. CC646 where Karen was the hostess. She chose powder pink, sweet sugarplum and mint macaron for her color trio. Optional this week is pearls. I used enamel dots because of the type of card I made and its for a little girl so pearls didn't work for me.
powder pink, sweet sugarplum, mint macaron
For the background  Iused sweet sugarplum designer paper from the Stampin'-Up "petal garden collection". I layered that onto sweet sugarplum cardstock and the card base is mint macaron.

The image panel is a birthday die from PTI. I layered a back panel of powder pink to hold the sequins in place. Embellished this panel with enamel dots & twine in the sweet sugarplum & mint macaron colors.

My heart balloon is a balloon die from CottageCutz. Stamped happy birthday in sweet sugarplum and my card is finished. Well, time for me to close this post. I have a few things I want to get done before my hubby comes home from work.
 
So until next time .......God bless
 
card details:
Stamps: island life (MFP)  
Paper: mint macaron, sweet sugarplum, very vanilla, petal garden dsp (Stampin'-Up)
Paper Size: A2  
Ink: sweet sugarplum
Accessories: Phrase Play 5 die (PTI), Balloons variety die (CottageCutz), sweet sugarplum twine, enamel dots, foam adhesive strips (Stampin'-Up), sequins (Darice), powder tool (EK Success)  
Techniques: Shaker Card  

I am also entering:
1.  Scrapper's Delights has an anything goes challenge.
2.  Stamps & Fun =Creativity has a special occasions challenge
3.  Crafting From the Heart has an anything goes challenge.
4Lil Patch of Crafty Friends has an anything goes challenge.
5.  Crazy 4Challenges has a layer it up challenge.


Saturday, November 4, 2017

Penguin Snowglobe Christmas

Hello Blogger Friends! Thanks for taking the time to stop and visit with the Charmed Life Blog today.

It's a beautiful Saturday here in Pittsburgh  Chilly but lots of sunshine. A good day for a making a nice pot of chicken noodle soup. My husband likes to make this type of soup. He considers it his specialty. But he is not feeling well today so I am going to make it. 

But before the soup making I wanted to get my post done for today. This card I made for my weekly DT post on the CottageCutz Blog.  Today, I am showing a couple of the new 2017 Christmas dies released by CottageCutz. They are the Snowglobe w/Fawn and the Snowglobe Friends dies. So let's get started with some details on my card for today.

Step 1: I started my card this week with my layout. I found this great sketch on Splitcoaststampers that I thought would work well for my card idea. Using a sketch is a good starting point when you are creating a card.
I look at the sketch design and then think of possibilities that would fit the circles, rectangles etc. It helps me to get my Mojo in gear. In this case, as soon as I saw the circle I thought of a snowglobe. You can see I am in Christmas mode.
Step 2:  Since my dies were already chosen, I needed to decide on the card colors as well as patterned paper. Of course, I wanted it to be red and green so I just needed some coordinating papers. Looked through my Christmas papers and found some stripes and dots paper.
Step 3: I decided on a white background for layer 1 of the sketch. But, I didn't want it plain white so I used a falling snow embossing folder. I like the deep embossing I was able to achieve with this folder.
Step 4: I cut layer 2 and 3 of the sketch from cardstock and the patterned paper. Used the CottageCutz Rectangle and Pierced Rectangle dies. On the dotted panel (Layer 2) I used the 2nd largest rectangle die and the 3rd largest pierced rectangle die.
On the striped panel, I used the 4th largest rectangle and the 4th largest pierced die.
Step 5: Now I am ready to cut my snowglobe and penguin. These dies are just too cute and so detailed. Even the snowballs for sale sign has incredible detail. And look at his cute little ice skates. You can click on any picture to make it larger.
Step 6: Time to start assembly of my card. Layered the embossed panel to the cherry red cardstock.
Then layered the patterned paper panels.
And finally, the snowglobe is attached it with dimensional adhesive. I doubled up on the dimensional adhesive because some of the globe was on the patterned paper panel and some directly on the embossed panel. By doubling up it evened everything out.
 Step 7: To finish off my card I wanted a Christmas sentiment. I used the smallest CottageCutz oval die and stamped the sentiment.
  Well, that's my card for today. I hope I have given you some inspiration for a Christmas card. And, maybe even for purchasing and using this new snowglobe die. So until next time.........God bless.

dies I used to create card:
http://www.scrappingcottage.com/cottagecutzsnowglobefriends.aspx

http://www.scrappingcottage.com/cottagecutzsnowglobewfawn.aspx

http://www.scrappingcottage.com/cottagecutzrectanglesetbasics.aspx

http://www.scrappingcottage.com/cottagecutzpiercedrectanglesetbasics.aspx

I am also entering:
1.  Crafty Friends has a Christmas challenge.
2.  Craft Rocket Challenge is Christmas is coming.
3.  Tic Tac Toe Challenge - from the board-vibrant, stripes and circle.


LinkWithin

Related Posts with Thumbnails