Saturday, January 28, 2017

Love Postage Valentine

Hello Blogger Friends. Thanks for taking the time to stop and visit with the Charmed Life blog. It was a cold and blustery day today here in Pittsburgh.
 
But, I stayed indoors and had a little girl from our church over for a craft day. She is only 8 but so interested in learning how to stamp. And, she loves die-cuts just like her teacher. We managed to make 3 cards for Valentine's Day. It was a fun day and she already wants to come back to make some shaker cards.
 
Now onto my card for today. This one I created for my weekly DT post on the CottageCutz Blog.
I started my card by using this weeks sketch #629 from Splitcoaststampers. Using a sketch most always is a good starting point for me. When I saw the square blocks in this one I thought the love postage dies would work perfectly.
 
Black Card Base: 4 1/4" x 5 1/2"
Red CardstockLayer: 4 1/8" x 5 3/8"
Sending Love Designer Paper Layer: 3 7/8" x 5 1/8"

Once I chose my card colors, I decided to use the designer paper because it has the same dotted lines and hearts as on the bear in the envelope. And for the wavy border on the sketch I am using red ribbon. After the picture was taken, I added the licorice twine.

 
My next step was to stamp my bear image. I stamped multiples just in case I wasn't happy with how  I colored him. I used both Prismacolor pencils and Copic markers for my coloring. This "Sweet Valentine" stamp set also has matching dies. I also cut the Love Postage images.

 
Finished the assembly of my card. Once it was done, I thought the ribbon and twine needed something so I added a bow. I used my bow-easy tool. The name does just what it says- makes bow tying really easy. 
Here is a close -up photo of the dies and bear image.
 
Well that's it for me for this post. So until next time.......God bless.
 
http://www.scrappingcottage.com/cottagecutzlovepostage.aspx

http://www.scrappingcottage.com/cottagecutzsweetvalentinesstampanddie.aspx
 
I am also entering:
1.  Crafting with DragonFlies has a valentine's card challenge.
2.  Hiding in my CraftRoom has an any holiday challenge. Mine is Valentine's Day.
3.  Really Reasonable Ribbon has a pink or red challenge with ribbon.
4.  C.R.A.F.T. challenge is love/valentines/anniversary
 

Wednesday, January 25, 2017

Coffee & Donut Love

Hello Blogger Friends! Thanks for taking the time to stop and visit with the Charmed Life Blog.
 
Well I am happy to say that I have finally gotten all my Christmas things put away. Whew what a job! Now I will be able to concentrate on the organization ideas for my craft room and also finishing up on some minor details in my newly remodeled kitchen.
 
Yesterday I found a cabinet knob that I like at Lowe's. I only bought one just in case it didn't look right. My hubby put it on last night and we both like it a lot. So tomorrow after preschool, I will drive there and get the others that I need. A new store opened up and they sent me a 10% coupon.
 
Now let's move onto my card for today. Valentine's Day will be here before you know it. I send out a few cards and also let some of our friends pick a card to give to their wives or husbands.
This one I made for the color challenge #617. Karen is our hostess and she chose old olive, blushing bride and pink pirouette as her color combo. 
old olive, blushing bride, pink pirouette
 My card is using the MOJO479 sketch.

The background was made using the Stampin'-Up "seasonal decorative masks". There are 4 stencils in this pack and I used the dots and stripes.
I used the Clarity brushes and Ranger spun sugar distress ink. It's a close match to pink pirouette -that pad was a bit dry and I didn't have a re-inker.

The Clarity brushes are awesome to work with. I love the way they lay down the color. I separated the panel with some pink pirouette cardstock that was cut with an MFT die.
For the long rectangle behind the image panel, I used old olive ribbon.

The coffee cup and whipped cream are a die from CottageCutz - mug with heart. I cut it in chocolate chip (one of my neutrals this week) and my heart in pink pirouette.
My donut is a stamp and die from Taylored Expressions - pizza my heart. I stamped and cut it in whisper white then layered chocolate chip over that and stamped again in blushing bride. I colored the sprinkles with Stampin'-Up markers.

The sentiment is also from Taylored Expressions set - "we go together". And, that completes my post for today. Time to get busy with some organization stuff around my house. So until next time.........God bless.
 
Card Details:
Stamps: pizza my heart and we go together (Taylored Expressions) 
Paper: choc chip, whisper white, pink pirouette, blushing bride
Paper Size: A2  
Ink: Pink Pirouette, Choc Chip (Stampin'-Up), Spun Sugar (Ranger)  
Accessories: Seasonal decorative masks, old olive satin ribbon (Stampin'-Up), mug w/heart die (CottageCutz), pizza my heart die (Taylored Expressions), Clarity Brushes, blueprints 3 (MFT)
 
I am also entering:
1.  Lemon Shortbread challenge #33 is anything goes. 
2.  Crafting From the Heart has an anything goes challenge.
3.  Stamps & Fun =Creativity has an anything goes challenge.


Saturday, January 21, 2017

~Udder-ly Awesome~

Hello Blogger Friends! Thanks for taking the time to stop and visit with the Charmed Life Blog. It's a beautiful, sunny Saturday morning here in Pittsburgh. We haven't seen the sun for several days so it's always nice when it comes out this time of year.
 
I have lots of household chores to do today and the brightness in my house gives me the inspiration to get them all done. I am still getting the last of my Christmas decorations put away.
 
I don't know about you but I feel this process takes considerably longer than getting everything out to decorate. I also took this opportunity to get rid of a few things that I haven't used for a few years. I just pass them along to our local Goodwill store and that way someone else can hopefully find a use for it.
 
Well, time to move onto my card for today. This one I made for my weekly DT post on the CottageCutz blog. I am using a couple of the new sets today with the On The Farm and Farm Animals
So let's get started with some details on the little farm scene I created on my card today.

Black Card Base: 4 1/4" x 5 1/2"
Image Panel: 4 1/8" x 5 3/8"
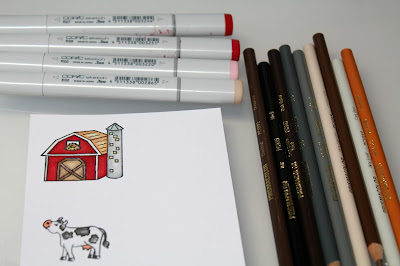
I started my card by stamping the images with Memento tuxedo black ink. I colored the images with Copic markers and Prismacolor pencils and gamsol. This ink doesn't bleed into your markers or pencils. I also used X-Press It blending cardstock. It is designed to work with Copic markers.
 
Markers & Pencils used to color images
After the images were colored I started on my background. I used tumbled glass distress ink for my sky then shabby shutters and mowed lawn for the grassy area. I used some torn paper to create the appearance of a hilly area. I wanted a softer background so I used a stencil brush. It achieved the look I was after. At the bottom of the card, I used tea dye distress ink for a non-grassy area.
 
I decided to use the "udder-ly awesome" sentiment from the farm Animals set. I cut a cloud from the "clouds & sun" die set as the spot for stamping. This sentiment is a single line and was just a bit to long for my cloud.  So I used my MISTI tool and took it to a 2 line sentiment. You just tape off the part that you don't want stamped and ink up your sentiment.
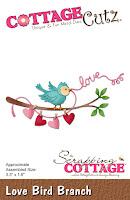
When I started the assembly of my card, I decided to use the fence stamp and die from the On The Farm set. And then I added some hearts going from the cow up to the sentiment. I just thought they fit so well with this sentiment. The hearts are from the Love Bird Branch die set.
 

That's it for me for today. So until next time.........God bless.

http://www.scrappingcottage.com/cottagecutzfarmanimalsstampanddie.aspx

http://www.scrappingcottage.com/cottagecutzonthefarmstampanddie.aspx

http://www.scrappingcottage.com/cottagecutzlovebirdbranch.aspx
 I am also entering:
1.  Crafting With Friends has an anything goes challenge.
2.  Creative Fingers has an anything goes challenge.
3.  Crafting With An Attitude #23 is anything goes.
 

Sunday, January 15, 2017

~ Peppermint Latte Thanks ~

Hello Blogger Friends! Thanks for taking the time to stop and visit with the Charmed Life Blog. Hope you all are having a good weekend.
 
We went to a fundraiser last night for a local policeman who was shot and killed when responding to a domestic violence call. There was a significant amount of money raised for the officers family. It felt really good to be a part of it.
Lots of local companies contributed in a big way to the fundraiser. In addition to having a great pasta and meatball dinner there were lots of donated prizes to be won.
 
And guess what? I won 4 tickets + a parking pass to a Pittsburgh Panther basketball game in February. I was so excited when they called my name. My hubby & I love going to the games but tickets are hard to come by, if you don't hold a season pass. Now we just have to decide who to take along with us.
 
Today, I am working on getting my Christmas decorations put away. But, I thought I would take a little break and do a blog post. So let's get started on some details of this card.
 
I created this one for the color challenge #616 on Splitcoaststampers. I was the hostess and my color trio was dapper denim, melon mambo and pear pizzazz. Optional was something new - a new year's card, new die or stamp or a new technique. 
dapper denim, melon mambo, pear pizzazz
I have something new on my card with the CottageCutz Peppermint Latte die and the Stampin'-Up thankful thoughts stamp set. I needed a thank you card for a gift I received for Christmas that was coffee themed.
My layout is from the MojoMonday #478 sketch. It worked well to show off my image as well as the sentiment.
My background striped panel is designer paper from the 2016-2018 in-color paper pack from Stampin'-Up. I cut the image and sentiment panels with the stitched rectangle and stitched circle dies from CottageCutz.

I used dimensional adhesive to lift up the cup a bit from the white panel. Just some added card interest. The sentiment is stamped in dapper denim ink from Stampin'-Up. To complete my card I scattered some die cut melon mambo hearts.
 
Well that's it for me for today. Time to get back to the packing away of my Christmas stuff. So until next time.........God bless.
 
card details:
Stamps: Thankful Thoughts
Paper: dapper denim, melon mambo, pear pizzazz, whisper white, 2016-2018 in-color paper pack  
Paper Size: A2
Ink: dapper denim
Accessories: CottageCutz Peppermint Latte, stitched rectangle and stitched circle dies , SB Matting Basics B, MFT blueprints 3 
 
I am also entering: 
1.  Making Memories Crafting Challenge #1 is anything goes.
2.  Polkadoodles has an anything goes challenge.
3.  Craft Rocket Challenge is something new. I used new stamp and dies.
 
http://www.scrappingcottage.com/cottagecutzpeppermintlatte.aspx
http://www.scrappingcottage.com/cottagecutzstitchedrectanglesetbasics.aspx

http://www.scrappingcottage.com/cottagecutzpiercedcirclesetbasics.aspx
 

Saturday, January 14, 2017

~Typewriter Love~

Hello Blogger Friends! Thanks for taking the time to stop and visit with the Charmed Life Blog. Another weekend is upon us and we have some plans for both days.
 
Today we are going to a fundraiser dinner for a local policeman who was killed during a call to a domestic dispute. Our next door neighbor is a policeman and his wife along with others have organized a dinner at a local church. 
 
Tomorrow we will be attending church with our extended family and then out to lunch. It's football playoff time and the Steelers are in the 2nd round. So tomorrow night is covered as well. And in between all of this, I still have to get my Christmas trees taken down and put away. So lots to keep me busy this weekend.
 
So let's get started with my card for today. This one I made for my weekly blog post on the CottageCutz blog. Another Valentine card but as I said previously, I need lots of them.
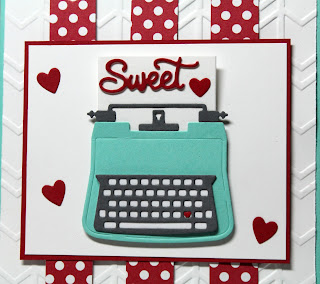
I am featuring one of the new CottageCutz Valentine dies today. This one is the Typewriter die and is currently on sale at 25% off. In fact all 14 new Valentine dies are 25% off. So drop over to the store and pick out what you need to make your Valentine cards and save a little money while your at it!

I jump started my mojo this week by using a sketch to get my creative juices flowing. So here are the details on how I created my card.

Coastal Cabana Card Base: 4 1/4" x 5 1/2"
Embossed Layer: 4 1/8" x 5 3/8"
Image Panel: 3 3/8" x 2 3/4"
Real Red Layering Panel: 3 1/2" x 2 7/8"

The sketch that I followed is an older one from Freshly Made Sketches but it worked perfectly to show my image off.
I decided to emboss my background panel but didn't want to use a heart embossing folder. So I settled for an arrows folder. I thought it added a unique appeal to my card.
 
Next step was to cut the elements of the typewriter die. I cut this vintage image in with coastal cabana cardstock. I love the modern appeal the typewriter has using this shade of blue. The accents are in gray. The little heart on the keyboard is so sweet. This is just the cutest die. I am sure all of you have someone in mind that this image would be perfect for this Valentine's day.
 
I cut three pennant flags with designer paper from Stampin'-Up's "polka dot parade" collection. Scattered some additional red hearts to balance out the image panel. I cut these from the Love Bird Branch die. After I assembled my card I decided I didn't like the "sweet" word cut in pink. Not a problem. I cut another one in red and glued it over top. Here are some close up photos. You can see the detail on this die.
 
Well, this completes my card for this post. Time for me to get busy with my day. So until next time........God bless.

http://www.scrappingcottage.com/cottagecutztypewriter.aspx

http://www.scrappingcottage.com/cottagecutzlovebirdbranch.aspx
 
I am also entering:
1.  Brown Sugar has an anything goes challenge.
2.  Hiding in my Craft Room has a super scraps Saturday. I used scraps of designer paper.
3.  Jo's Scrap Shack has an anything goes challenge.

Wednesday, January 11, 2017

Happy Valentine's Day

Hello Blogger Friends! Thanks for taking the time to stop and visit with the Charmed Life Blog.
 
Today was my day to drive over and pick up my youngest grandson at school. He has so much going on at the school after hours that I haven't been able to go over and pick him up lately.
 
It would be silly to drive to the other side of town during rush hour and then drop him off at home at dinner time. I like to spend some time with my son and daughter-in-law as well but I don't feel right to stay at dinner time. It would be like inviting myself to dinner.
 
So today was a treat for me to go and get him early. I had time to visit and then we went out to dinner at The Cheesecake Factory. We had an enjoyable evening together and a great meal.
 
Now onto my card for today. This is another that I created for my weekly post on the CottageCutz Blog. My layout is from the Wednesday sketch challenge #626 on Splitcoaststampers.
 
Black Card Base: 4 1/4" x 5 1/2"
red Heart Embossed Layer: 4 1/8" x 5 3/8"
Black Layer For Image Panel: 3 1/2" x 4 1/2"
Image Panel: 3 3/8" x 4 1/4"
 
For the image panel I used a white corrugated paper I found in my stash. And on the red background, I used a hearts embossing folder. The Happy Valentine's Day die is a new die and is now available in the online store.
 
 
I decided to make a substitute on the circles in the sketch on this card. I used 2 die cut images and then the "V' from the Happy Valentine's Day die cut served as the middle shape.
 
Well that's it for me for this post. So until next time........God bless.
 
card details:
Paper: Basic black, real red, white corrugated paper (Stampin'-Up)
Paper Size: A2  
Accessories: love bow & arrow die, happy valentine's day phrase(CottageCutz), Hearts embossing folder (Darice)
 
I am also entering:
1.  Creative Moments has an anything goes challenge.
2.  Inspiration Destination has an anything goes challenge.
3.  Moo-Mania and More has a love challenge.

Saturday, January 7, 2017

Valentine Love

Hello Blogger Friends! Thanks for taking the time to stop and visit with the Charmed Life Blog this first Saturday of January.
 
Today we are going to my extended family Christmas celebration. We have 2 big get togethers throughout the year - one in the summer and one at Christmas time. Everyone will bring a side dish to share and my sister in law will bake a huge ham and we buy chicken. I am making mac 'n cheese. I thought the kids would like that as well as the adults.
 
It will be a good time of seeing family. My brother's house is big and the floor plan is such that it can easily accommodate 50-70 people. That's how many will be in attendance.
 
Now onto my card for today. This one I created for my weekly blog post on the CottageCutz blog. I am starting my Valentine cards because I send a lot of them and also give some of them to the guys at church to give to their wives. 
 
So here are the details on how I created this card as well as lots of photos for the step by step process.
 
Red Card Base: 4 1/4" x 5 1/2"
Patterned Paper Layer: 4 1/8" x 5 3/8"
Red Layer For Image Panel: 3 1/2" x 4 1/2"
Image Panel: 3 3/8" x 4 1/4"
 
My layout is from this week's sketch #626 on Splitcoaststampers. You will notice on the sketch photo they have circles. When you use a sketch it's a starting point. You can always substitute the images. As long as your finished card resembles the sketch your good.
 
Once I decided on this card layout, I chose my patterned paper and that determined by card colors. I cut all the layers and then the die cuts. I am using the new Love Bow & Arrow die which will be in the online store soon for purchasing.
 
Before I assembled my image panel, I stamped my sentiment. The stamp was a bit to long for this panel so I masked part of it off and stamped it on 2 lines. I used my MISTI tool to accomplish this. Although any stamp positioner would work as well. I placed the bottom heart on the panel so I would have an idea of where to place my sentiment. 


 For the long rectangle strip in the sketch, I used pink cardstock measuring 3/4" x 5 1/2" and a heart embossing folder for added texture.

I added my die cut images.   After I assembled my card, I thought the image panel looked bare. So I scattered some love words and hearts to finish it off. I was happy with the finished card.
 
Well that's it for me for this post. Enjoy your day whatever you have planned. And, until next time...............God bless.

card details:
Stamps: love you with all my heart (MFT) 
 Paper: real red, whisper white , pretty in pink, christmas cocoa dsp (Stampin'-Up)
 Paper Size: A2
 Ink: tuxedo black (Memento)
 Accessories: love bow & arrow die (CottageCutz, adorning accents embossing folder (Stampin'-Up)
 
I am also entering: 
1.  A Gem of a Challenge is celebrating something new. I am using new dies.  
2.  Crafty Calendar Challenge is something new.
3.  Just Us Girls word week challenge is "new".


LinkWithin

Related Posts with Thumbnails