Tuesday, August 30, 2016

~Give Thanks~

Hello Blogger Friends! Thanks for taking the time to stop and visit with the Charmed Life Blog.
 
It's a beautiful Tuesday here in Pittsburgh. Our warm weather and sunshine is continuing. In a couple of days September will be upon us and it will be time to start thinking of the upcoming Thanksgiving holiday. I send cards to family and friends and my card today is the first one of this season.
 
It was created for my weekly DT post on the CottageCutz Blog. So let's get started on how I created my card. I made a different size card today. This one is 3 1/2" x 5 1/2" - a tall and skinny card. 
 
Old Olive Card Base: 3 1/2" x 11" - scored at 5 1/2"
Stenciled panel: 3 3/8" x 5 3/8"
Image Panel: 2 3/8" x 4 1/2"
 
I was going to use designer paper and none of my stash was catching my eye. So I decided to do some stenciling on the background panel. I really like the leaves on this die so I cut them from scrap white cardstock and used them as my template. And, also different distress inks.
I used a stencil brush to feather in the leaf colors. I really like the soft look that I was able to achieve with this brush. Just another way to get more use from your dies.
Now that my background is complete, I went for the next layer and chose some 1 1/4"wide striped olive grosgrain ribbon. It matches my card base. I also used a corner rounder on this panel for some added interest.
At this point I am ready to cut my dies to layer on this panel. I used a curry colored cardstock for one of my leaves and the other 2 a reddish brown shade and the pumpkin of course is cut in orange. For my Give Thanks word, I used a purple cardstock. I also used the corner rounder on this image panel.
Here are some close-up photos. Just wanted you to see the detail on the pumpkin and leaves as well as the beautiful font on the Give Thanks word.
 
Well, that's it for me for this post. Until next time..........God bless.
 
http://www.scrappingcottage.com/cottagecutzgivethanks.aspx
I am also entering:
1.  Crafting From the Heart has an anything goes challenge.
2.  613 Avenue Create is anything goes.
3Crafting When We Can has a die-cut punch challenge.

Wednesday, August 24, 2016

Christmas Cardinals + Background Technique

Hello Blogger Friends! Hope this Wednesday in August finds you all well. We had a couple of days of cooler temps and I was able to open up the windows and enjoy the fresh air.
 
But, today it will be a sizzler again with a high near 90°. So to cool things off a bit, in my mind at least (lol), I am showing a card I created with a winter theme. It is for both the color challenge #597 on Splitcoaststampers and my weekly DT post on the CottageCutz Blog.
 
For the color challenge, Vicki is our hostess and she chose tempting turquoise, real red and emerald envy for her color palette. Optional was to use birds on your project.
tempting turquoise, real red, emerald envy

So let's get started with the details on my project.  I am also showing a technique that I tried for the first time and just love the outcome. It's a resist technique requiring just a few simple steps to create a shimmery background. I thought it would be perfect as a backdrop for the Christmas cardinals. It reminded me of a snow squall. I found this tutorial on Splitcoaststampers. Basically here is what I did.
 
Turquoise Card Base: 5 1/2" x 4 1/4"
Background Panel: 5 1/8" x 3 7/8"
 
Technique: Faux Mother of Pearl
1. You need some metallic white paint. I used DecoArt white pearl dazzling metallic. You use cling wrap and crumple it to use as the applicator for the paint. You will need to use either a craft mat or paper to protect your work surface. This technique gets a little messy.
 
2.   I squeezed a small amount of the paint on my craft sheet. Dip the plastic wrap into the paint and pounce it on the craft sheet a few times to work it into the cling wrap and also to remove excess paint. Then you tap it lightly onto your cardstock. Repeat this step until you have your cardstock covered. I left some open area on my cardstock because I wanted the look of snow.
 

3. Once you have applied the paint where you want it, set your cardstock aside to dry.

4. Now it's time to start adding your ink. You can use a sponge, blending tool or even a brayer. I used a sponge on my cardstock. The ink color is turquoise.
5.  I applied the ink all over my cardstock. As you are applying ink your metallic design will start showing through.  The paint will resist the dye ink.
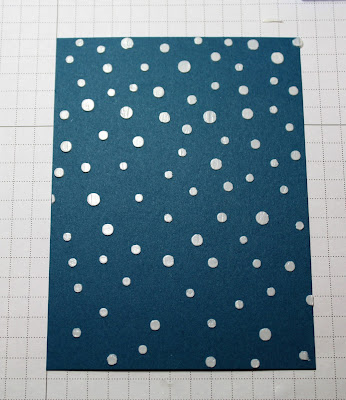
Once you have the look you want, take a paper towel and buff the cardstock to remove the ink that is laying on top of the acrylic paint. Then you will see more of the metallic paint design. This creates your faux Mother of Pearl design.


  I created several of these backgrounds and it was tough getting a good picture. This particular background is one that I didn't use on my finished card but it was the one that cooperated with my camera.
6.  Now that the background is prepared, I decorated it with the Cardinals and Birdhouse dies.  The Merry Christmas sentiment is from the Christmas Santa die set. I used multi-matte adhesive, and dimensional adhesive to attach the die cuts.
 
 
 Well, that's it for me for this post. I hope you have been inspired to give this technique a try even if you aren't making your Christmas cards yet. And. don't forget about the birthday challenge on the CottageCutz Blog. There are prizes to be won and it's running until 8-31-16. Get details here.
 
So until next time........God bless.
 
http://www.scrappingcottage.com/cottagecutzcardinalsandbirdhouse.aspx

http://www.scrappingcottage.com/cottagecutzmerrychristmassanta.aspx
 
 I am also entering:
 1.  Crafty Hazelnuts Christmas Challenge has an anything goes
 2.  12 Months of Christmas has an anything goes challenge.
 3.  Crafting When We Can has a dies/punches challenge.


Wednesday, August 17, 2016

Christmas Tags

Hello Blogger Friends and a Happy Wednesday to you. I just realized today that our new Pre-School year starts in about 3 weeks.   I have been off since the end of May but it certainly doesn't seem like it.
 
Still not sure how the summer months went by so quickly. I received an email yesterday from QVC reminding me that Christmas is only 4 months away. Yikes, I would like to put the brake on time. If only that were possible (lol)!!
 
Anyway, let's move to my post for today. Today is my DT post on the CottageCutz blog. I have made 2 tags so let's get started on my creative process this week.
 
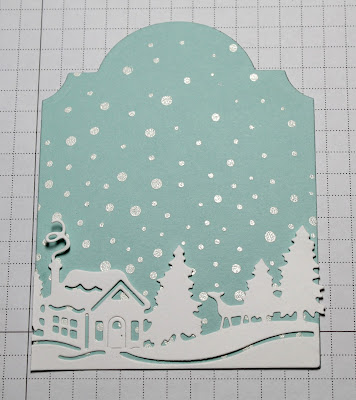
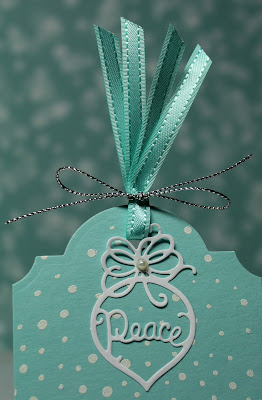
For the first tag I used the Winter Cabin Border and the Ornament Trio dies. To create this tag, I used the CottageCutz Rectangle Die-the largest one in the set. I then stamped the background snowflakes with Versamark ink and embossed with white embossing powder on pool party cardstock.
I didn't want to have a square topped tag so here's what I did to make a pretty tag top. My rectangle base is 3" wide, so I needed a die wide enough to only cut the top of the tag. I ended up using the Spellbinders Labels 28 die.
I placed the cardstock so the side edges are not on the cutting edge of the die.
 
Now on to decorating the tag. I cut both the Winter Cabin Border die and a single ornament from the Ornament trio dies in white cardstock.
 
To complete this tag I punched a hole at the top and ran my pool party ribbon through. I tied it with silver cording. I attached my ornament, added a pearl to finish the tag off.

Now onto my 2nd tag. For this one I used the Merry Christmas Santa die. I cut my tag in red cardstock, found the patterned paper I wanted to use and cut my Santa image.  I also used the Stitched Circle Dies and cut a circle with the 5th largest die to position Santa in the center of it.
 
I added a little snow mound at the bottom of the circle for Santa to stand on. For the mound I used the sand from the seagull die. Just another way to get additional use out of your dies. I used glue and sprinkled some chunky glitter on the snow mound.
I used the same chunky glitter and added it to Santa's hat, belt, arm cuffs and hat. Isn't he such a cute Santa image?

To complete this tag, I stamped a sentiment on olive cardstock and cut it in a flag shape. I embossed the sentiment to make it stand out on the tag. Sentiment is from the MFT gift tag greetings set.  I added white satin ribbon and tied it with Stampin'-Up real red striped ribbon.
Thanks for staying with me through the entire post today. Hope I gave you some ideas for your own Christmas tags. Also, as a remind our our current challenge is going on for August. The theme is birthday and you can get more info here.
 
Until next time.......God bless.


Sunday, August 14, 2016

~ Birthday Flowers ~

Hello Blogger Friends! Thanks for taking time out of your day to stop and visit with the Charmed Life Blog.
 
It's a beautiful Sunday here in Pittsburgh. I am getting ready to do some canning of fresh tomatoes today. Ours are coming in nicely but I don't have quite enough for canning. I will use them for marinara sauce and other various recipes. They are excellent when oven roasted and then pureed for a nice sauce.
 
So Friday night I decided to take a trip to one of the area Farmer's Markets. I was specifically looking for Roma tomatoes. Two of the farms at this market had them so I bought 1/2 bushel. That's about 25 lb of tomatoes which is just a little more than what I need for the recipe I use.
 
A new purchase for me this year is a tomato corer. It will make removing the cores of the tomatoes so much easier. I briefly tested it and I can core 4 tomatoes in 30 seconds. So much faster than doing it with a pairing knife. On my next post, I will give an update along with a photo of my canning efforts.
 
Now onto my card for today. this one I created for the color challenge #594 on Splitcoaststampers. I am your hostess this week and have chosen watermelon wonder, peekaboo peach and pear pizzazz as the color trio. Optional is flowers or fruit. So perfect since our flower and vegetable gardens are in full bloom.
watermelon wonder, peekaboo peach, pear pizzazz
 I started my card this week by choosing my designer paper. Well, in fact I should say I chose the color palette from the Stampin’-Up Fruit Stand Designer paper collection. I just love the beautiful colors & designs that Stampin’-Up put in that collection.

So that’s my background paper and I layered that over watermelon wonder cardstock. This layer is popped up from the card base for dimension. Over this layer I used some retired Stampin’-Up “peach parfait ribbon. It’s a little darker than the new peach shade but I think it works well with the designer paper. My card base is the new in-color peekaboo peach.

The image panel is using the field flowers stamp set. It’s a 2 step stamp set and to get the color gradient I stamped the watermelon wonder off 2x and then stamped the image.
 
The detail stamp is stamped full strength. I decided to fussy cut one of the flowers and pop it up on my card for added interest. I also popped up this layer from the designer paper layer. 

 To complete my card, I stamped my sentiment and added some peach enamel dots. That's my card for today. So until next time.......God bless.

card details:
Stamps: Field Flowers (Stampin’-Up), Seashells (MFP)
Paper: peekaboo peach, watermelon wonder, whisper white, fruit stand dsp (Stampin’-Up)
Paper Size: A2
Ink: watermelon wonder, pear pizzazz, tuxedo black (Memento) 
Accessories: 2016-2018 in-color enamel dots, peach parfait ribbon, dimensionals (Stampin’-Up), ½” mounting tape (Scotch)  
Techniques: 2 step stamping

I am also entering:
1 613 Avenue Create is anything goes. Optional is anything goes. 
2.  Glitter 'N Sparkle is anything goes.
3.  Stamping Sensations is anything goes.      


Wednesday, August 10, 2016

Snowman Christmas

Good morning Blogger Friends and thanks for dropping by the Charmed Life Blog. It's been hazy, hot and humid in the Pittsburgh area for several weeks now. Just our typical summer weather that is so perfect for farms and for backyard vegetable gardens.
 
I have been enjoying my next door neighbors pool quite a lot this summer. She is so generous about us coming over whenever we want. I have said it before, but I have the best neighbors.
Last night the neighbor on the other side of me sent over a plate of Lasagna for dinner. She does that frequently when my hubby is working nights. It's such a blessing to me.
 
I just thought I would start off my blog post today with an encouraging message. There is always so much bad news around us. So it's good to stop and just be thankful for the little things in life. 
 
Now onto my post for today. This is the card I posted on the CottageCutz Blog today for my weekly DT spot. I am featuring a card using some of the new dies from the brand new CottageCutz Christmas 2016 release. I used the Snowman w/Lamp Post & Merry Christmas Ribbon dies.

All the new dies are available in the Scrapping Cottage Store right now and they are 25% off for a limited time. The design team will be featuring the new dies in our blog posts for inspiration. It's not too early to start thinking about your 2016 Christmas cards and design.

So without further ado let's get started with some details on what I have created here today.  
 White Card Base: 4 1/4" x 5 1/2"
Dapper Denim Striped Designer Paper: 4 1/8" x 4 7/8"
Dapper Denim layer underneath: 4 1/4" x 5"
Dapper Denim Snowflake Layer: 3 1/4" x 4 3/8"
Smokey Slate Image Panel: 2 3/4" x 3 1/2"

 The colors for my card are from the color challenge #593 on Splitcoaststampers. I like making Christmas cards with non-traditional colors. It helps to take me out of my comfort zone and stretch my creativity. I also like the look of using diagonal stripes on a Christmas card.
sweet sugarplum, cucumber crush, dapper denim
I started off with my layout this week. It's an older MojoMonday sketch. I have said before that I like working with sketches because it also helps to jump start my creativity. Especially when I have the dies in mind that I want to use. I like the challenge of getting my idea to fit into the confines of the sketch. I did take some liberties with this sketch and eliminated the small diagonal panel on the bottom right.
 
Once I had the all the card panel sizes figured out, I decided to use a stencil to create a snowflake background for my snowman. I did this with some 3-D molding paste to give the snowflakes a little dimension.
 
I use painters tape to secure the stencil. It holds the stencil in place well. When I am finished I just lift the tape on the right side only and remove the stencil.
 
I cut the snowman in white mixed media paper because my original idea was to watercolor and then I switched and decided to do some paper piecing and die in-laying. I liked how this little fellow turned out. I inlaid his buttons. eyes, nose and mouth.
 
The lamp post is part of this new die set. I cut it to match his hat, scarf and little ornament. The snowbank is included as part of this set. It's just too cute. Don't you think?
 
In place of the 2 banners in this sketch I used the Merry Christmas Ribbon die.  I like the look of it in the corner. This is thick enough so you only need to cut one layer. I used ranger multi-matte medium to adhere it. I like this adhesive because it dries clear.
 
And that my friends is my card for this post. Hope it gave you some inspiration to get started with your own Christmas cards.
 
Just a reminder about our latest challenge -it's #5 and all about birthdays this month. Get the details here.
 
Until next time........God bless.
http://www.scrappingcottage.com/cottagecutzsnowmanwlamppost.aspx

http://www.scrappingcottage.com/cottagecutzmerrychristmasribbonelites.aspx

I am also entering:
1.  Christmas Cards All Year 'Round has a bright summer colors challenge.
2.  Classic Design Team Open Challenge has an anything goes.
3.  12 Months of Christmas link up is anything goes
 

LinkWithin

Related Posts with Thumbnails